Table of Contents
What is the most terrifying moment for an indie developer?
It’s that moment when your side project finally goes viral on LinkedIn or Reddit, traffic starts flooding in, and you realize your site is running on a $2.99/month Hostinger shared hosting plan.
Last week, my new tool site, PSEO.click, went through exactly this “rollercoaster.” Within 24 hours, our traffic doubled, and total requests surged past 8,000.
If this were a standard, unoptimized server, it likely would have crashed with a 503 Service Unavailable error.
But it didn’t. The site stayed fast, and the server load remained low. Why? Because I made one crucial decision the day before: deploying the Cloudflare free plan.
In this post, I’ll break down the data behind this “mini-viral” event and share how you can protect your cheap hosting from traffic spikes using free tools.
The Crisis: When the Traffic Hit
As a B2B SEO tool, I expected slow, linear growth. However, a few targeted LinkedIn posts triggered a spike in engagement.
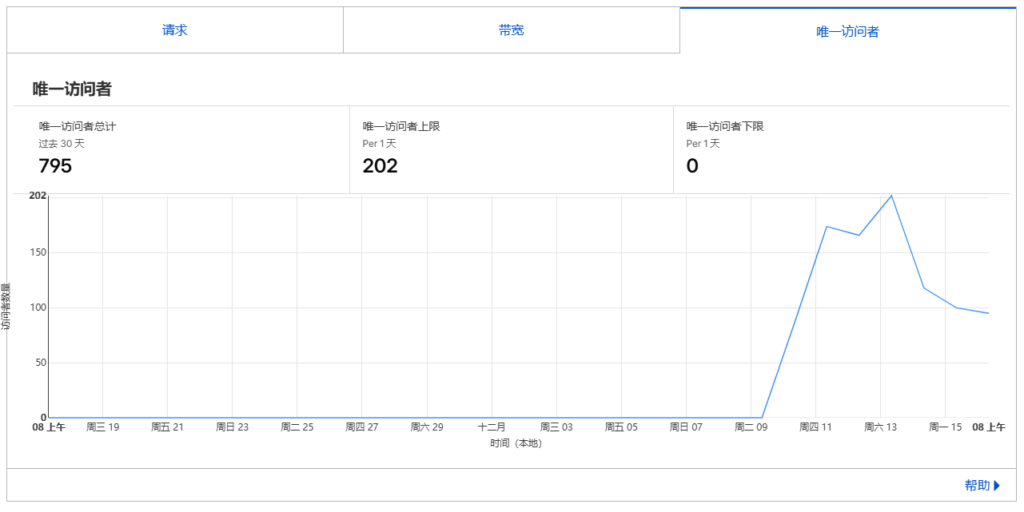
Here is what the data looked like:
- Daily Unique Visitors (UV): 700+ (Highly targeted B2B users).
- Total Requests (24h): Spiked to 14,550.
I am using a basic Hostinger shared hosting plan. Anyone familiar with shared hosting knows that CPU and RAM resources are strictly limited. A sudden concurrency of 8,000 requests is usually enough to get your account temporarily suspended for “resource abuse.”
The Savior: The Power of the Cloudflare Free Plan
Fortunately, I had routed my DNS through Cloudflare. This single move saved the site.
Let’s look at the numbers from the “battlefield”:
- Total Requests: 14,550
- Cached Requests: 8,510
- Uncached Requests: 6,050
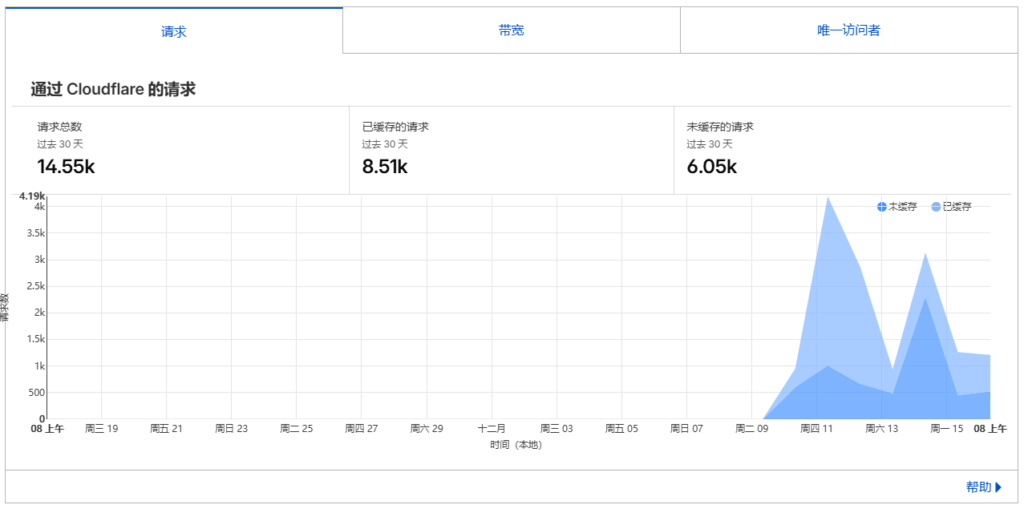
What does this mean?
It means that 71.5% of the traffic never even touched my Hostinger server.
These 14,550+ requests were intercepted and served instantly by Cloudflare’s global edge network. My origin server (the cheap one) only had to deal with about 2,200 requests, which is completely manageable.
How-To: Optimizing Cloudflare for Static Sites
If you are running a WordPress site or a static HTML tool like mine, here are the exact settings I used to achieve this result:
1. Enable the “Orange Cloud” (Proxy Mode)
In your Cloudflare DNS settings, make sure the cloud icon next to your A record is Orange (Proxied), not Grey (DNS Only). If it’s grey, you aren’t getting any CDN benefits or protection.
2. Aggressive Caching
For tool pages or blogs where content doesn’t change every minute, you should cache aggressively.
- Go to Caching -> Configuration.
- Set Browser Cache TTL to at least 1 Year (or “Respect Existing Headers”).
3. Warning: Watch Out for “Rocket Loader”
This was a mistake I made early on. Cloudflare’s Rocket Loader is great for speed scores, but it can break third-party tracking scripts like Umami or Google Analytics.
- Tip: If your analytics suddenly show “0 visitors” despite site activity, go to Speed -> Optimization and turn Rocket Loader OFF.
4. The Purge Habit
Since we are caching heavily, users won’t see your code updates immediately.
- Workflow: Every time I push a code update (like tweaking the Schema Generator), I immediately go to Caching -> Configuration -> Purge Everything. It takes 30 seconds, but ensures everyone sees the new version.
Conclusion: You Don’t Need Expensive VPS
This experience proved one thing: Architecture matters more than budget.
You don’t need to upgrade to a $20/month VPS just because you are getting some traffic. By combining Cloudflare (Free CDN) with Hostinger (Cheap Hosting) and Static HTML, you can build a robust infrastructure that handles traffic spikes for pennies.
Save your money for marketing, not servers.
If you are interested in Programmatic SEO or need free tools like a Schema Generator, check out my project: PSEO.click